How to Make Crispy Medu Vada with an Airy Centre Every Time
Master the classic Tamil Nadu tiffin staple with the right urad dal grinding technique, batter aeration, and frying temperature control.
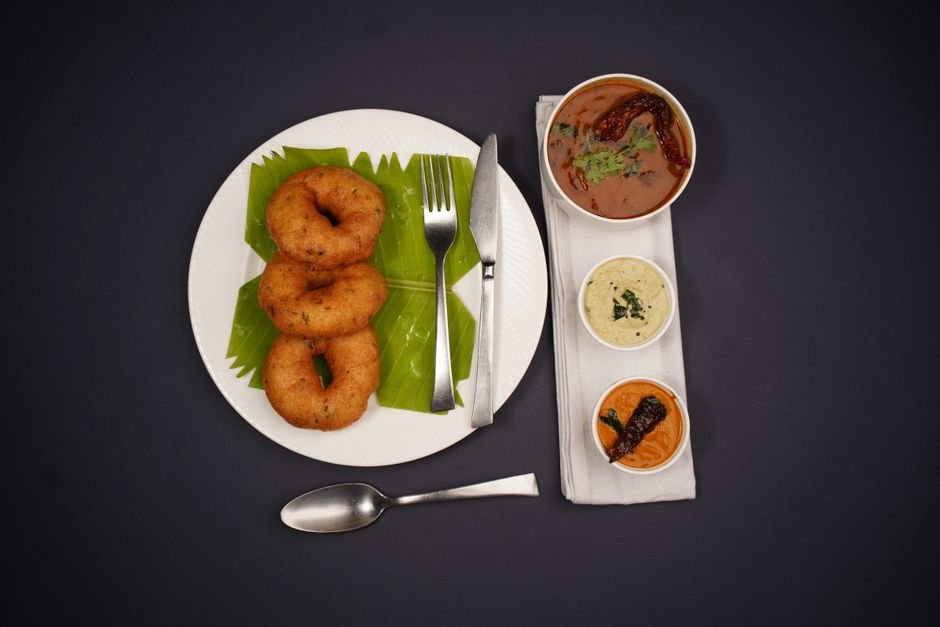
A well-made medu vada is one of the greatest highlights of South Indian tiffin culture. When done right, the exterior shatters with a crisp crunch, revealing a cloud-soft, fragrant interior that absorbs just enough sambar without turning mushy. Yet, for many home cooks, vadas often turn out dense, oil-soaked, or flat.
Achieving restaurant-quality medu vada at home does not require commercial equipment. It relies on understanding how urad dal behaves when soaked, ground, and fried. Here is a step-by-step breakdown of how to prepare the batter and fry the vadas to crisp perfection.
1. Choosing and Soaking the Dal
Always use whole white urad dal (gota urad) rather than split dal. Whole dal yields significantly more volume when ground and holds aeration better. Look for fresh, unpolished dal for the best texture.
Rinse the dal thoroughly in cold water until the water runs clear. Soak it for exactly two to three hours. Soaking for too long weakens the starch structure, causing the batter to absorb excessive oil during frying. If the weather in your kitchen is warm, you can chill the soaked dal in the refrigerator for 30 minutes before grinding to prevent the motor heat from warming the batter.
2. Grinding: The Crucial Stage
The texture of your vada is decided entirely at the grinder. A traditional tabletop wet grinder produces the fluffiest batter, but a standard heavy-duty mixer grinder works well if you follow a few precautions.
- Drain thoroughly: Strain the soaked dal completely using a colander. Do not pour excess soaking water into the grinding jar.
- Add water by the tablespoon: Start grinding without adding water. Add ice-cold water just one tablespoon at a time, only when the blades struggle to turn. The total water needed is usually no more than three to four tablespoons per cup of dry dal.
- Keep it cool: Grind in short pulses to keep the batter from heating up. Warm batter turns runny and leads to greasy vadas.
- The water float test: Drop a small ball of batter into a bowl of clean water. If it floats instantly like a light dumpling, your batter is ready. If it sinks, you need to aerate it further.
3. Seasoning and Aeration
Transfer the ground batter to a wide mixing bowl. Use your clean hand or a whisk to beat the batter vigorously in a single circular direction for two to three minutes. This incorporates tiny air pockets that create a soft, spongy crumb inside the vada.
Once aerated, fold in the seasonings gently without deflating the batter:
- Finely chopped green chillies and fresh ginger
- Coarsely crushed whole black peppercorns
- Whole cumin seeds (jeera)
- Freshly torn curry leaves
- A generous pinch of asafoetida (perungayam)
- Salt to taste (always add salt at the very end just before frying, as it draws out moisture)
Avoid adding chopped raw onions unless you intend to fry the entire batch immediately. Onions release water quickly and will thin out your batter within minutes.
4. Shaping the Vadas
Shaping a medu vada requires a light touch and wet hands. Keep a small bowl of water next to your stove.
Dip your fingers in the water, shake off the excess, and scoop a golf-ball-sized portion of batter into your palm. Gently flatten it into a disc with your thumb and press a hole right through the centre. The central hole is functional rather than decorative; it ensures the thickest part of the vada cooks through evenly at the same rate as the edges.
Slide the shaped batter smoothly into the hot oil by tilting your fingers. If shaping by hand feels difficult, you can shape the batter on the back of a wet flat ladle, a banana leaf, or a tea strainer, then invert it directly over the hot oil.
5. Frying and Temperature Control
Heat neutral cooking oil or groundnut oil in a deep kadai. The oil should be at medium heat—around 175°C to 180°C. If the oil is too hot, the exterior will brown immediately while the interior stays raw and pasty. If the oil is not hot enough, the batter will sink and absorb fat.
Test the oil by dropping a tiny speck of batter into it. It should rise to the surface within two seconds without browning immediately. Slide four to five vadas into the kadai, taking care not to overcrowd the pan.
Let the vadas rise to the top undisturbed for a minute before gently flipping them with a slotted spoon. Fry on medium flame, turning occasionally, until both sides turn a rich golden brown. Remove them and drain on a wire rack rather than paper towels; a wire rack allows steam to escape freely, keeping the crust crisp.
How to Fix Common Batter Mistakes
If your batter turns slightly loose or watery, resist the temptation to add raw all-purpose flour (maida). Instead, mix in one to two teaspoons of fine rice flour or roasted semolina (sooji). This absorbs excess moisture while adding an extra layer of crunch to the crust. Alternatively, place the bowl of batter in the refrigerator for 20 minutes to firm it up before shaping.
Serve your medu vadas piping hot straight from the kadai alongside freshly ground coconut chutney and a bowl of hot tiffin sambar.
Photo: Jack Baghel / Pexels